> ## Documentation Index
> Fetch the complete documentation index at: https://docs.usetuner.ai/llms.txt
> Use this file to discover all available pages before exploring further.
# Create Evals
> Browse Tuner's predefined eval library and create custom evals to check for the specific behaviors and outcomes that matter most to your business. This guide walks through the eval library and the custom eval builder.
## What Are Evals?
**Evals** are the criteria Tuner uses to judge whether your agent did the right thing on each call. They run automatically on every production call and every [**Call Simulation**](/user-guide/simulation/introduction-to-call-simulation) run.
Tuner ships with a library of pre-built evals, including Hallucination, Missed Intent, Tool Hallucination, and more, but you can also define your own when you need something specific to your business:
* **Check for specific keywords or phrases**: Did the agent mention the daily special?
* **Verify a specific action was taken**: Was an appointment successfully booked?
* **Monitor for compliance**: Did the agent read the required legal disclaimer?
Evals are separate from **voice metrics** (latency, talk-to-listen ratio, sentiment) and from **call outcomes** (Success / Failure). Outcomes tell you *what happened*; evals tell you *whether the agent followed the rules along the way*.
***
## Open the Evals Section
In **Agent Settings**, open the **Evaluation Rules** tab. The **Evals** section lists every eval currently active on this agent, both library evals and custom ones you've created.
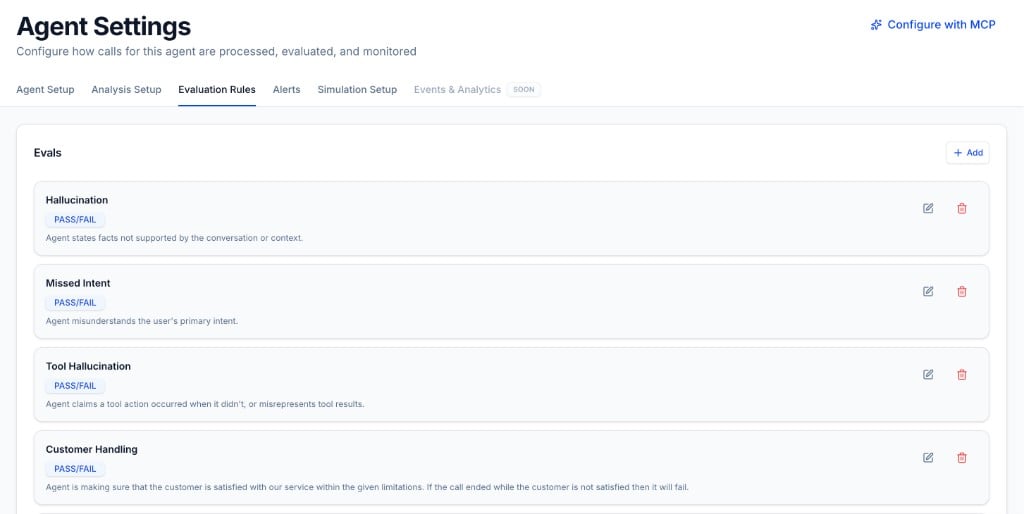 Click **+ Add** in the top-right of the **Evals** section. This opens the eval library, where you can browse pre-built evals or start a custom one.
***
## Add Evals from the Library
The **Add evals** modal lets you pick from Tuner’s built-in library. Evals are grouped by category (**Accuracy**, **Actions & Tools**, **Conversation Quality**, and **Safety & Compliance**), and you can search or filter to find what you need.
Click **+ Add** in the top-right of the **Evals** section. This opens the eval library, where you can browse pre-built evals or start a custom one.
***
## Add Evals from the Library
The **Add evals** modal lets you pick from Tuner’s built-in library. Evals are grouped by category (**Accuracy**, **Actions & Tools**, **Conversation Quality**, and **Safety & Compliance**), and you can search or filter to find what you need.
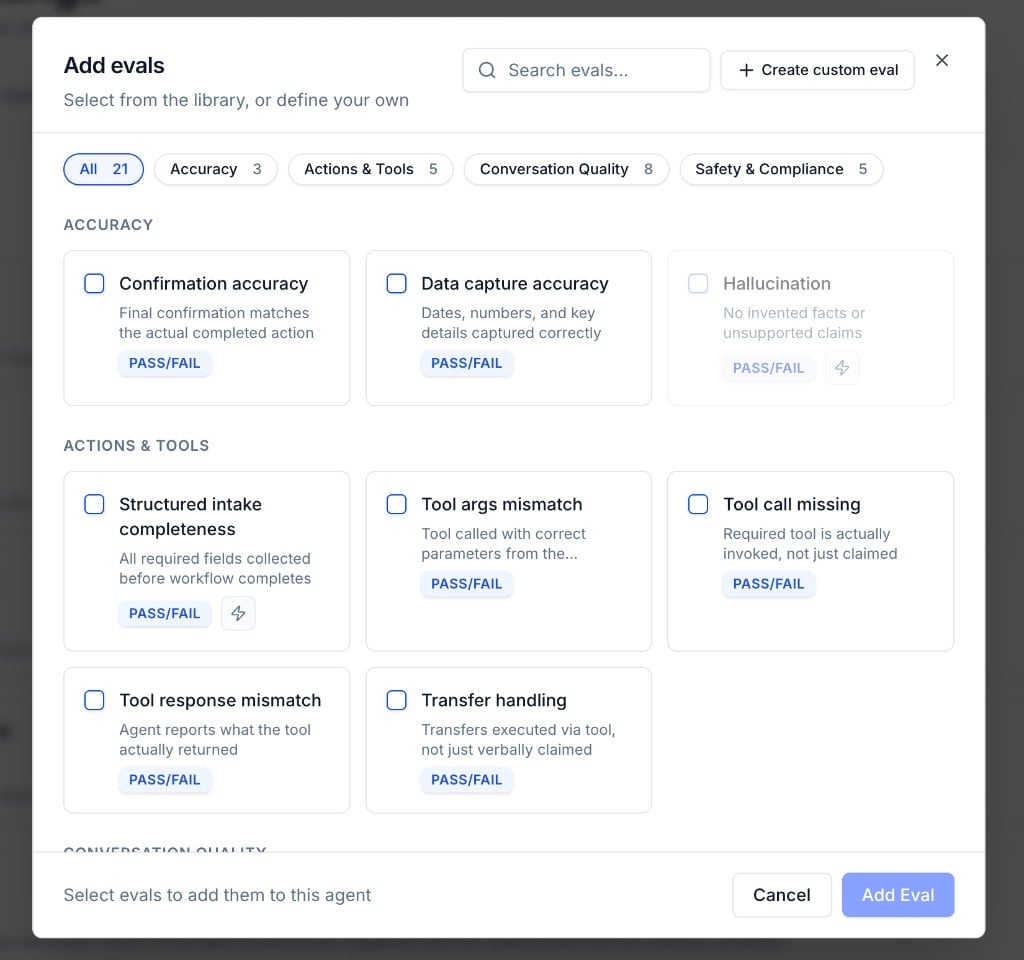 Use the category filters or the search bar to find evals that match your use case. Each card shows a short description and whether it uses **Pass/Fail** scoring.
Check the evals you want, then click **Add Eval**. They appear immediately in your **Evals** list and start running on all future calls.
Start with the defaults: **Hallucination**, **Missed Intent**, and **Tool Hallucination** cover the most common failure modes. Add industry- or business-specific evals from the library or create custom ones as you learn what matters for your agent.
***
## Create a Custom Eval
When the library doesn't have what you need, click **+ Create custom eval** in the top-right of the **Add evals** modal.
Use the category filters or the search bar to find evals that match your use case. Each card shows a short description and whether it uses **Pass/Fail** scoring.
Check the evals you want, then click **Add Eval**. They appear immediately in your **Evals** list and start running on all future calls.
Start with the defaults: **Hallucination**, **Missed Intent**, and **Tool Hallucination** cover the most common failure modes. Add industry- or business-specific evals from the library or create custom ones as you learn what matters for your agent.
***
## Create a Custom Eval
When the library doesn't have what you need, click **+ Create custom eval** in the top-right of the **Add evals** modal.
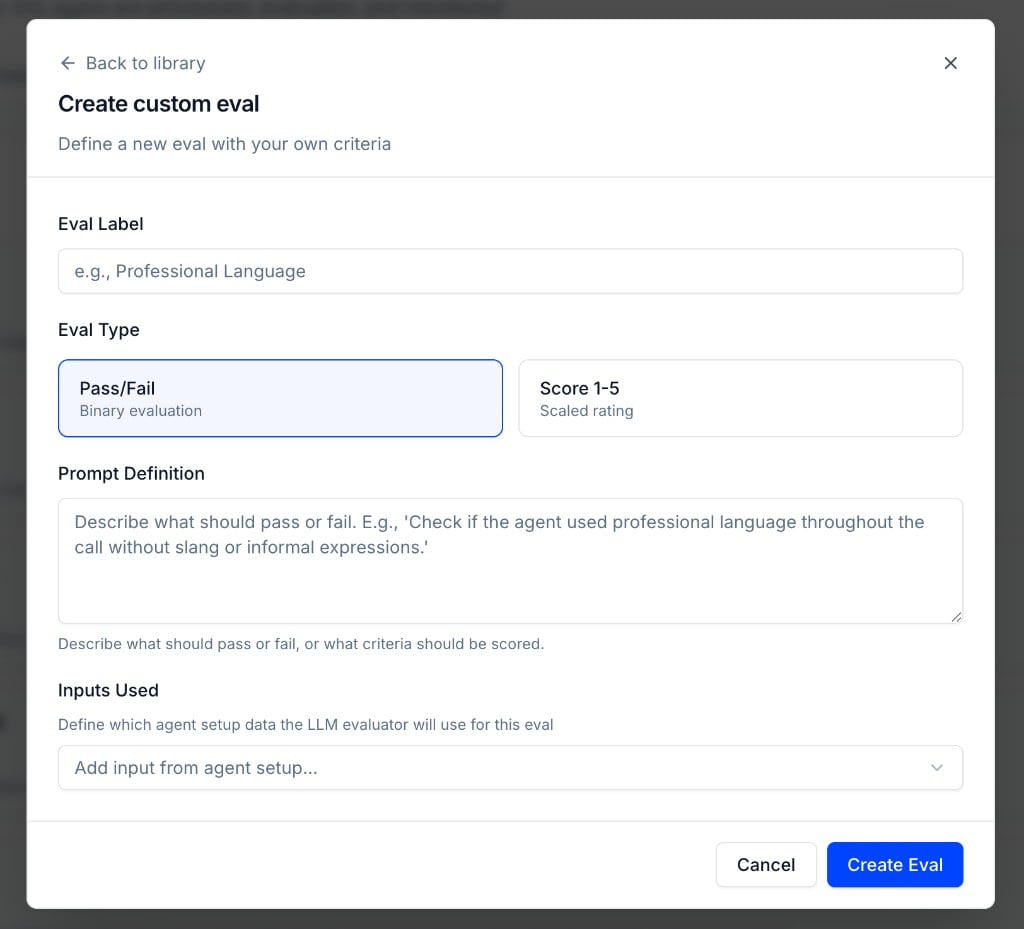 Give your eval a clear, descriptive name, for example *Professional Language* or *Disclaimer Read*. This label appears in call results, dashboards, and alerts.
Pick how the eval should score each call:
* **Pass/Fail**, binary evaluation; the call either meets the criteria or it doesn't.
* **Score 1–5**, scaled rating when you need a gradient (e.g. tone quality or thoroughness).
Describe what should pass or fail in plain language. The LLM evaluator uses this as its rubric. Be specific. Vague prompts produce inconsistent results.
**Example:** *"Check if the agent stated the following disclaimer verbatim: 'This call may be recorded for quality assurance.'"*
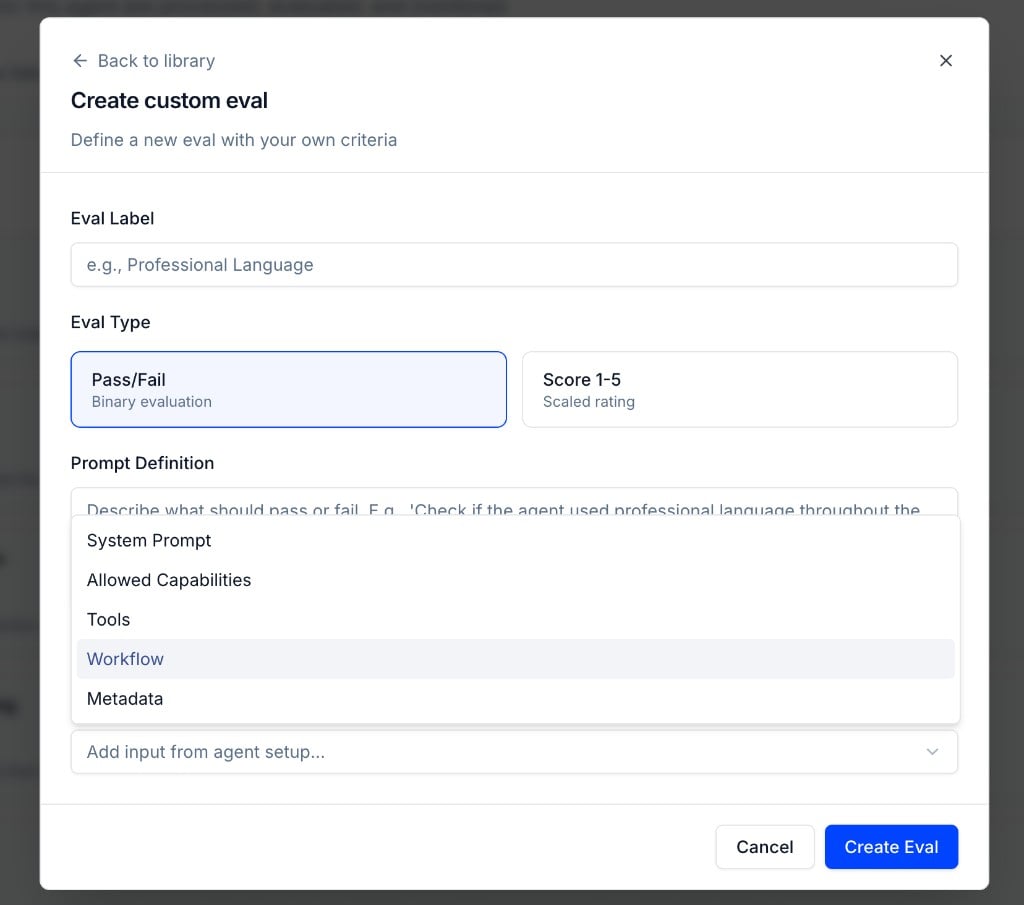
Under **Inputs Used**, choose which agent setup data the evaluator can reference when scoring the call. Click **Add input from agent setup...** and select one or more:
* **System Prompt**, the base instructions configured in Agent Setup
* **Allowed Capabilities**, what the agent is permitted to do
* **Tools**, the tools available to the agent
* **Workflow**, the agent's workflow definition
* **Metadata**, per-call context you attach when pushing calls via the API (see [Evaluating Agents with Dynamic Instructions](/docs/agent-configurations/evaluating-dynamic-agents))
Give your eval a clear, descriptive name, for example *Professional Language* or *Disclaimer Read*. This label appears in call results, dashboards, and alerts.
Pick how the eval should score each call:
* **Pass/Fail**, binary evaluation; the call either meets the criteria or it doesn't.
* **Score 1–5**, scaled rating when you need a gradient (e.g. tone quality or thoroughness).
Describe what should pass or fail in plain language. The LLM evaluator uses this as its rubric. Be specific. Vague prompts produce inconsistent results.
**Example:** *"Check if the agent stated the following disclaimer verbatim: 'This call may be recorded for quality assurance.'"*
Under **Inputs Used**, choose which agent setup data the evaluator can reference when scoring the call. Click **Add input from agent setup...** and select one or more:
* **System Prompt**, the base instructions configured in Agent Setup
* **Allowed Capabilities**, what the agent is permitted to do
* **Tools**, the tools available to the agent
* **Workflow**, the agent's workflow definition
* **Metadata**, per-call context you attach when pushing calls via the API (see [Evaluating Agents with Dynamic Instructions](/docs/agent-configurations/evaluating-dynamic-agents))
 You can combine multiple inputs. For example, use **System Prompt** and **Metadata** together when runtime instructions vary per call but you still want the evaluator to see the base prompt.
Click **Create Eval**. The eval is added to your agent and runs on every future call, production and simulation alike.
***
## Example: Checking for a Disclaimer
Suppose you need to verify that your agent always reads a legal disclaimer. Create a custom eval with:
| Field | Value |
| --------------------- | --------------------------------------------------------------------------------------------------------------- |
| **Eval Label** | Disclaimer Read |
| **Eval Type** | Pass/Fail |
| **Prompt Definition** | Check if the agent stated the following disclaimer verbatim: "This call may be recorded for quality assurance." |
| **Inputs Used** | System Prompt (optional, include if the disclaimer is defined in your prompt) |
If a call doesn't meet this criterion, the eval fails. You can then use the **Rule Builder** to trigger a red flag or alert when this eval fails.
***
## Managing Evals
From the **Evals** list on the **Evaluation Rules** tab, you can:
* **Edit** an eval: click the pencil icon to change its label, prompt, type, or inputs.
* **Delete** an eval: click the trash icon to remove it from the agent. It will no longer run on new calls.
Changes take effect immediately on the next call processed.
***
### Next Steps
Learn how to configure real-time alerts to be notified when evals fail.
A step-by-step guide to setting up real-time alerts in Tuner.
Not sure which evals to add next? Diagnose your agent to find which behaviors need to be measured based on real call data.
You can combine multiple inputs. For example, use **System Prompt** and **Metadata** together when runtime instructions vary per call but you still want the evaluator to see the base prompt.
Click **Create Eval**. The eval is added to your agent and runs on every future call, production and simulation alike.
***
## Example: Checking for a Disclaimer
Suppose you need to verify that your agent always reads a legal disclaimer. Create a custom eval with:
| Field | Value |
| --------------------- | --------------------------------------------------------------------------------------------------------------- |
| **Eval Label** | Disclaimer Read |
| **Eval Type** | Pass/Fail |
| **Prompt Definition** | Check if the agent stated the following disclaimer verbatim: "This call may be recorded for quality assurance." |
| **Inputs Used** | System Prompt (optional, include if the disclaimer is defined in your prompt) |
If a call doesn't meet this criterion, the eval fails. You can then use the **Rule Builder** to trigger a red flag or alert when this eval fails.
***
## Managing Evals
From the **Evals** list on the **Evaluation Rules** tab, you can:
* **Edit** an eval: click the pencil icon to change its label, prompt, type, or inputs.
* **Delete** an eval: click the trash icon to remove it from the agent. It will no longer run on new calls.
Changes take effect immediately on the next call processed.
***
### Next Steps
Learn how to configure real-time alerts to be notified when evals fail.
A step-by-step guide to setting up real-time alerts in Tuner.
Not sure which evals to add next? Diagnose your agent to find which behaviors need to be measured based on real call data.