> ## Documentation Index
> Fetch the complete documentation index at: https://docs.usetuner.ai/llms.txt
> Use this file to discover all available pages before exploring further.
# Connecting to Vapi
> Connect your Vapi voice assistant to Tuner. The integration is a no-code process that can be completed in minutes.
**Prerequisites:** You'll need an active Vapi account and a Tuner account to follow this guide.
## Overview
Connecting your Vapi assistant to Tuner follows this order: gather credentials from Vapi, **save your Vapi Private API key in Tuner Workspace Settings first**, then **create your agent**.
Copy your Private API key and Assistant ID from the Vapi dashboard.
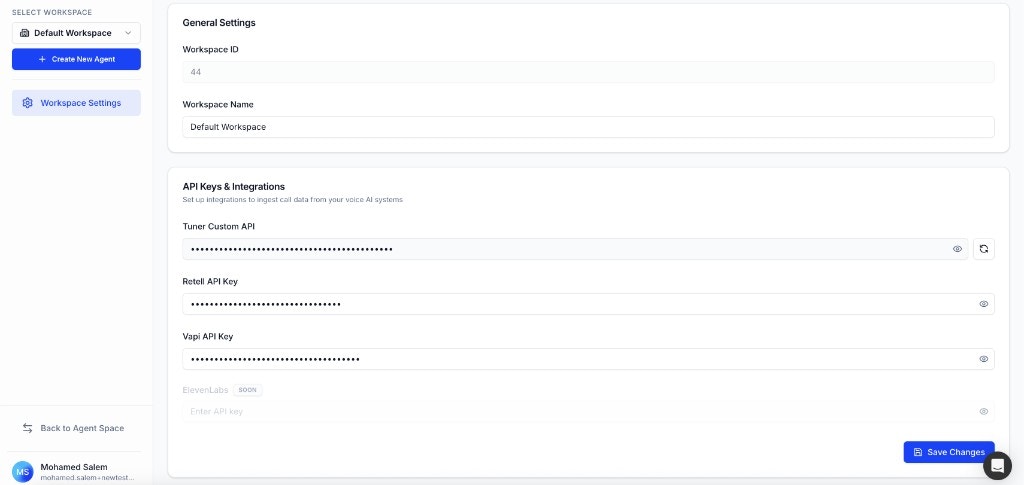
Paste your Private key under **Workspace Settings** → **API Keys & Integrations** and save, before you create an agent.
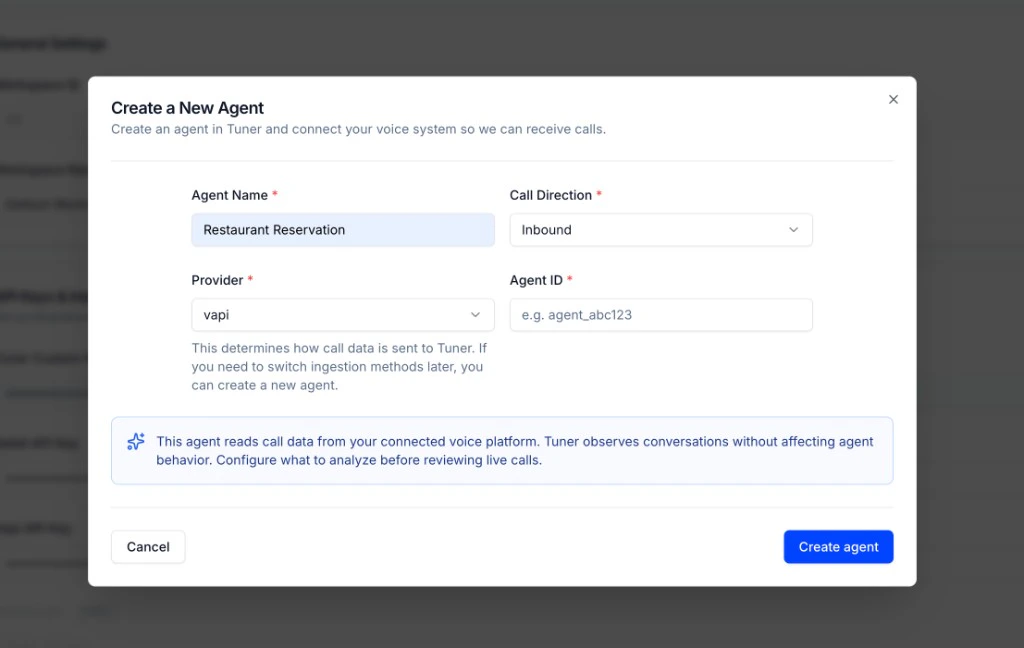
Fill in **Create a New Agent** and click **Create agent**.
**Estimated time:** 5 minutes from start to finish
**No Webhook Configuration Needed:** Tuner automatically handles the webhook setup for you. After your Vapi Private API key is saved and your agent is created with the correct Assistant ID, Tuner will configure everything in the background.
***
## Step 1: Get Your Vapi API Key
Use a **Private API Key** from Vapi, not the **Public** key. The Public key is meant for client-side use; Tuner needs a Private key for secure server-side access.
1. Log in to the [Vapi dashboard](https://dashboard.vapi.ai/).
2. Open **API Keys** using either path:
* Click your **profile menu** (top right) and choose **Vapi API Keys**, or
* Go directly to [dashboard.vapi.ai/org/api-keys](https://dashboard.vapi.ai/org/api-keys).
3. Under **Private API Keys**, either copy an existing key or click to **create** a new one.
4. Keep the key safe. You will paste it into **Tuner Workspace Settings** in Step 3.
If you only see a **Public** key, create or reveal a **Private** key in the same API Keys area. Never paste your Private key into frontend code or public repos.
Treat your Private API Key like a password. Do not commit it to source control or expose it in client-side code.
***
## Step 2: Get Your Vapi Assistant ID
1. In the [Vapi dashboard](https://dashboard.vapi.ai/), open **Assistants** (for example [dashboard.vapi.ai/assistants](https://dashboard.vapi.ai/assistants)).
2. Click the assistant you want to connect to Tuner.
3. Copy the **Assistant ID**. It is a unique identifier (often shown on the assistant detail page and used in API calls).
The Assistant ID may also appear in the page URL when you are viewing that assistant in the dashboard.
***
## Step 3: Add your Vapi API key in Tuner (before creating an agent)
Do this **before** you click **Add New Agent**, so your workspace is authorized to talk to Vapi when you finish setup.
1. In Tuner, open **Workspace Settings** (gear icon in the sidebar).
2. Under **API Keys & Integrations**, paste your **Vapi Private API Key** into the **Vapi API Key** field.
3. Click **Save Changes**.
 ***
## Step 4: Create your agent in Tuner
1. Click the **Select Agent** dropdown in the sidebar and select **Add New Agent**.
2. In the **Create a New Agent** modal, fill in the required fields:
* **Agent Name:** A display name for this agent in Tuner.
* **Call Direction:** **Inbound** or **Outbound**, matching how this assistant is used.
* **Provider:** **vapi**. This tells Tuner how call data is ingested.
* **Agent Remote ID:** Paste the **Assistant ID** you copied from Vapi.
3. Click **Create agent**.
***
## Step 4: Create your agent in Tuner
1. Click the **Select Agent** dropdown in the sidebar and select **Add New Agent**.
2. In the **Create a New Agent** modal, fill in the required fields:
* **Agent Name:** A display name for this agent in Tuner.
* **Call Direction:** **Inbound** or **Outbound**, matching how this assistant is used.
* **Provider:** **vapi**. This tells Tuner how call data is ingested.
* **Agent Remote ID:** Paste the **Assistant ID** you copied from Vapi.
3. Click **Create agent**.
 That's it! Tuner will automatically configure the connection with Vapi in the background.
***
## Webhooks
You can add a webhook URL to your agent under **Agent Settings** → **Webhooks** to receive Tuner events — call analysis results and real-time alerts. For Vapi agents, Tuner also forwards the **original Vapi call payload** to your URL, so if you already had a webhook set in Vapi (n8n, Zapier, etc.), your existing automations keep working after connecting to Tuner.
See the [Webhooks](/docs/agent-configurations/webhooks) guide for setup and payload examples.
## Troubleshooting
Verify that you pasted the full **Assistant ID** from Vapi with no extra spaces before or after.
Confirm you saved a **Private** API key in **Workspace Settings** → **API Keys & Integrations** *before* creating the agent, not the **Public** key.
If connection fails, generate a new Private API Key in Vapi, update it in Tuner, and try again.
***
## 🎉 Congratulations!
You've successfully connected your Vapi assistant to Tuner! Here's what you've accomplished:
✅ Obtained your Vapi Private API Key and Assistant ID from Vapi
✅ Saved your Vapi API key in Tuner Workspace Settings first
✅ Created your agent in Tuner with the correct Assistant ID
✅ Tuner automatically configured the connection
### What's Next?
Your Vapi assistant is now connected. Future calls can be sent to Tuner for analysis.
Create a SIP trunk in Vapi, connect it to Tuner, and run your first simulation batch.
Set up MCP or blank configuration and send your first call.
Use your IDE or chat app to generate outcomes, intents, evaluations, and alerts automatically.
A step-by-step guide to analyzing your first call.
Learn how to effectively monitor your agent and catch issues early.
That's it! Tuner will automatically configure the connection with Vapi in the background.
***
## Webhooks
You can add a webhook URL to your agent under **Agent Settings** → **Webhooks** to receive Tuner events — call analysis results and real-time alerts. For Vapi agents, Tuner also forwards the **original Vapi call payload** to your URL, so if you already had a webhook set in Vapi (n8n, Zapier, etc.), your existing automations keep working after connecting to Tuner.
See the [Webhooks](/docs/agent-configurations/webhooks) guide for setup and payload examples.
## Troubleshooting
Verify that you pasted the full **Assistant ID** from Vapi with no extra spaces before or after.
Confirm you saved a **Private** API key in **Workspace Settings** → **API Keys & Integrations** *before* creating the agent, not the **Public** key.
If connection fails, generate a new Private API Key in Vapi, update it in Tuner, and try again.
***
## 🎉 Congratulations!
You've successfully connected your Vapi assistant to Tuner! Here's what you've accomplished:
✅ Obtained your Vapi Private API Key and Assistant ID from Vapi
✅ Saved your Vapi API key in Tuner Workspace Settings first
✅ Created your agent in Tuner with the correct Assistant ID
✅ Tuner automatically configured the connection
### What's Next?
Your Vapi assistant is now connected. Future calls can be sent to Tuner for analysis.
Create a SIP trunk in Vapi, connect it to Tuner, and run your first simulation batch.
Set up MCP or blank configuration and send your first call.
Use your IDE or chat app to generate outcomes, intents, evaluations, and alerts automatically.
A step-by-step guide to analyzing your first call.
Learn how to effectively monitor your agent and catch issues early.