> ## Documentation Index
> Fetch the complete documentation index at: https://docs.usetuner.ai/llms.txt
> Use this file to discover all available pages before exploring further.
# SIP for Twilio, Telnyx, LiveKit & Other Platforms
> Get a SIP URI and credentials from any SIP provider, then paste into Tuner.
Start at [**Simulation SIP setup**](/docs/simulation/setup).
Tuner only needs a **SIP URI** and (if your edge uses digest auth) a **username** and **password**. Any provider that issues those will work.
The tabs below cover SIP setup and provider-specific Call-ID documentation for the most common platforms.
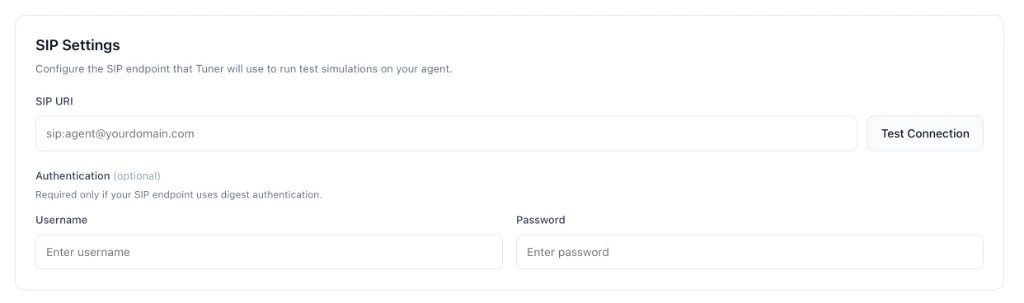
1. Open Tuner → **Agent Settings** → **SIP Settings**.
2. Paste **SIP URI**, **Username**, and **Password** exactly as your provider issued them (leave username/password empty if your edge does not use digest auth).
3. Click **Verify & Save**.
 That's it, no provider-specific steps required.
### SIP setup
**What is Twilio?** [Twilio](https://www.twilio.com/) is a cloud communications platform that lets you place and receive phone calls programmatically. Its **Elastic SIP Trunking** product gives you a SIP endpoint on Twilio's network that you can dial from anywhere on the internet, which is what Tuner needs to reach your agent.
Use **Elastic SIP Trunking** and copy the trunk's **Termination SIP URI** plus a **Credential List** username/password.
* SIP URI shape: `sip:@.pstn.twilio.com`
* Username / Password: the values from your Credential List.
Follow Twilio's docs for the current Console steps:
* [Elastic SIP Trunking, getting started](https://www.twilio.com/docs/sip-trunking/getting-started)
* [Credential Lists](https://www.twilio.com/docs/sip-trunking/api/credentiallist-resource)
Paste the result into Tuner → **Agent Settings → SIP Settings**.
### Syncing the Call-ID
Twilio separates the voice webhook (HTTP) from the audio stream (WebSocket). SIP headers are available on the webhook but **not forwarded to the WebSocket by default**, you need to configure custom parameters in your TwiML response.
* [Elastic SIP Trunking](https://www.twilio.com/docs/sip-trunking)
* [Media Streams — Custom Parameters](https://www.twilio.com/docs/voice/media-streams/websocket-messages#custom-parameters)
### SIP setup
**What is Telnyx?** [Telnyx](https://telnyx.com/) is a communications platform similar to Twilio that provides voice, SMS, and SIP trunking on its own private IP network. Its **SIP URI calling** feature exposes your SIP Connection at `sip:@sip.telnyx.com` so external clients like Tuner can dial it directly.
On an active **SIP Connection** with **credential authentication**, enable **Receive SIP URI calls**.
* SIP URI shape: `sip:@sip.telnyx.com`
* Username / Password: the same credential pair.
Follow Telnyx's docs for the current portal steps:
* [SIP URI calling](https://developers.telnyx.com/docs/voice/sip-trunking/features/sip-uri-calling)
* [Credential types](https://developers.telnyx.com/docs/voice/sip-trunking/authentication/credential-types)
Paste the result into Tuner → **Agent Settings → SIP Settings**.
### Syncing the Call-ID
Telnyx offers both XML-based streaming and Call Control (JSON webhooks). How SIP headers reach your app differs between the two, check which integration mode you're using.
* [SIP Trunking](https://developers.telnyx.com/docs/voice/sip-trunking)
* [Call Control — Streaming](https://developers.telnyx.com/docs/voice/programmable-voice/call-streaming)
### SIP setup
[Plivo](https://www.plivo.com/) provides SIP trunking and programmable voice. Copy your SIP endpoint URI and credentials from the Plivo console, then paste them into Tuner → **Agent Settings → SIP Settings**.
* [Plivo SIP trunking](https://www.plivo.com/docs/voice/sip-trunking/)
### Syncing the Call-ID
Plivo uses XML to control calls. SIP headers may need to be forwarded as extra headers on the stream element.
* [Plivo XML — Stream](https://www.plivo.com/docs/voice/xml/stream/)
### SIP setup
[Exotel](https://exotel.com/) exposes SIP endpoints through its platform configuration. Copy the SIP URI and credentials your Exotel setup provides, then paste them into Tuner → **Agent Settings → SIP Settings**.
* [Exotel developer docs](https://developer.exotel.com/)
### Syncing the Call-ID
Exotel surfaces call metadata through its App Bazaar applet configuration. Custom parameters need to be set in the applet to forward SIP identifiers.
### SIP setup
[Jambonz](https://www.jambonz.org/) is an open-source CPaaS for SIP and WebRTC. Configure an inbound SIP trunk or application endpoint, then paste the URI and credentials into Tuner → **Agent Settings → SIP Settings**.
* [Jambonz docs](https://www.jambonz.org/docs/)
### Syncing the Call-ID
Jambonz delivers SIP information on the call-hook webhook (HTTP), not the WebSocket. You'll need to bridge the two in your server code. If the call passes through multiple SIP hops, look for an `X-CID` header.
### SIP setup
[Daily](https://www.daily.co/) supports SIP/PSTN dial-in for real-time audio sessions. Copy the SIP URI from your Daily project settings, then paste it into Tuner → **Agent Settings → SIP Settings**.
* [Daily SIP / PSTN docs](https://docs.daily.co/reference/rest-api/sip)
### Syncing the Call-ID
Daily includes SIP information directly in the dial-in settings payload, no extra configuration is needed.
### SIP setup
**What is the LiveKit SIP bridge?** It is an **optional** add-on service for LiveKit projects that lets a normal phone call (SIP) enter a LiveKit room so your agent worker can talk to the caller. If you are building on LiveKit, you can choose to use this bridge as your phone ingress, or you can keep using your own SIP provider (Twilio, Telnyx, etc.) instead.
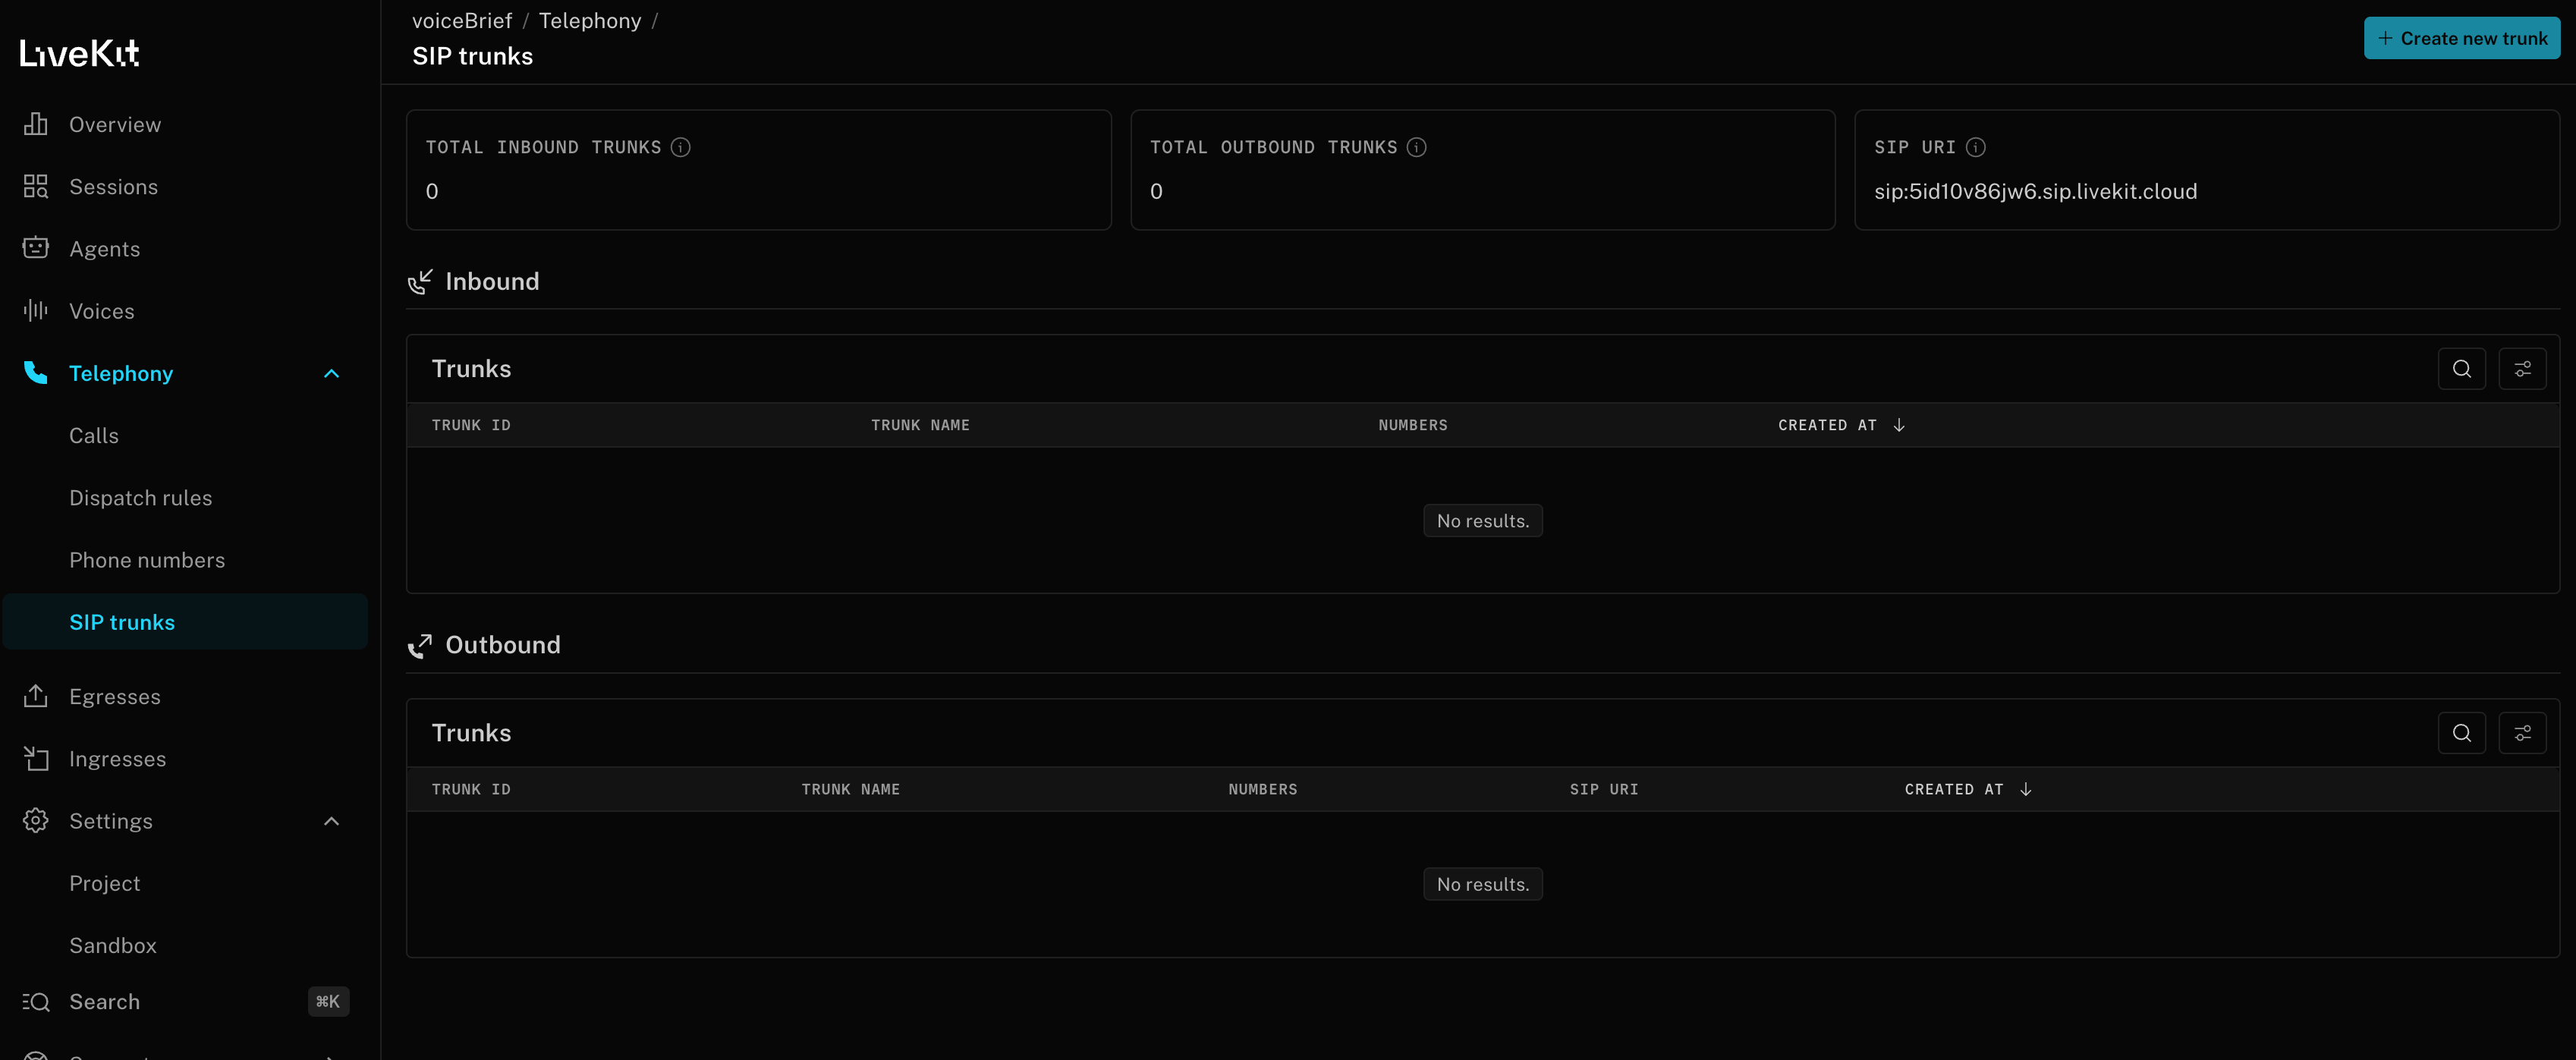
1. **SIP URI:** copy your project's SIP URI from the LiveKit Cloud console (shape: `sip:.sip.livekit.cloud`).
That's it, no provider-specific steps required.
### SIP setup
**What is Twilio?** [Twilio](https://www.twilio.com/) is a cloud communications platform that lets you place and receive phone calls programmatically. Its **Elastic SIP Trunking** product gives you a SIP endpoint on Twilio's network that you can dial from anywhere on the internet, which is what Tuner needs to reach your agent.
Use **Elastic SIP Trunking** and copy the trunk's **Termination SIP URI** plus a **Credential List** username/password.
* SIP URI shape: `sip:@.pstn.twilio.com`
* Username / Password: the values from your Credential List.
Follow Twilio's docs for the current Console steps:
* [Elastic SIP Trunking, getting started](https://www.twilio.com/docs/sip-trunking/getting-started)
* [Credential Lists](https://www.twilio.com/docs/sip-trunking/api/credentiallist-resource)
Paste the result into Tuner → **Agent Settings → SIP Settings**.
### Syncing the Call-ID
Twilio separates the voice webhook (HTTP) from the audio stream (WebSocket). SIP headers are available on the webhook but **not forwarded to the WebSocket by default**, you need to configure custom parameters in your TwiML response.
* [Elastic SIP Trunking](https://www.twilio.com/docs/sip-trunking)
* [Media Streams — Custom Parameters](https://www.twilio.com/docs/voice/media-streams/websocket-messages#custom-parameters)
### SIP setup
**What is Telnyx?** [Telnyx](https://telnyx.com/) is a communications platform similar to Twilio that provides voice, SMS, and SIP trunking on its own private IP network. Its **SIP URI calling** feature exposes your SIP Connection at `sip:@sip.telnyx.com` so external clients like Tuner can dial it directly.
On an active **SIP Connection** with **credential authentication**, enable **Receive SIP URI calls**.
* SIP URI shape: `sip:@sip.telnyx.com`
* Username / Password: the same credential pair.
Follow Telnyx's docs for the current portal steps:
* [SIP URI calling](https://developers.telnyx.com/docs/voice/sip-trunking/features/sip-uri-calling)
* [Credential types](https://developers.telnyx.com/docs/voice/sip-trunking/authentication/credential-types)
Paste the result into Tuner → **Agent Settings → SIP Settings**.
### Syncing the Call-ID
Telnyx offers both XML-based streaming and Call Control (JSON webhooks). How SIP headers reach your app differs between the two, check which integration mode you're using.
* [SIP Trunking](https://developers.telnyx.com/docs/voice/sip-trunking)
* [Call Control — Streaming](https://developers.telnyx.com/docs/voice/programmable-voice/call-streaming)
### SIP setup
[Plivo](https://www.plivo.com/) provides SIP trunking and programmable voice. Copy your SIP endpoint URI and credentials from the Plivo console, then paste them into Tuner → **Agent Settings → SIP Settings**.
* [Plivo SIP trunking](https://www.plivo.com/docs/voice/sip-trunking/)
### Syncing the Call-ID
Plivo uses XML to control calls. SIP headers may need to be forwarded as extra headers on the stream element.
* [Plivo XML — Stream](https://www.plivo.com/docs/voice/xml/stream/)
### SIP setup
[Exotel](https://exotel.com/) exposes SIP endpoints through its platform configuration. Copy the SIP URI and credentials your Exotel setup provides, then paste them into Tuner → **Agent Settings → SIP Settings**.
* [Exotel developer docs](https://developer.exotel.com/)
### Syncing the Call-ID
Exotel surfaces call metadata through its App Bazaar applet configuration. Custom parameters need to be set in the applet to forward SIP identifiers.
### SIP setup
[Jambonz](https://www.jambonz.org/) is an open-source CPaaS for SIP and WebRTC. Configure an inbound SIP trunk or application endpoint, then paste the URI and credentials into Tuner → **Agent Settings → SIP Settings**.
* [Jambonz docs](https://www.jambonz.org/docs/)
### Syncing the Call-ID
Jambonz delivers SIP information on the call-hook webhook (HTTP), not the WebSocket. You'll need to bridge the two in your server code. If the call passes through multiple SIP hops, look for an `X-CID` header.
### SIP setup
[Daily](https://www.daily.co/) supports SIP/PSTN dial-in for real-time audio sessions. Copy the SIP URI from your Daily project settings, then paste it into Tuner → **Agent Settings → SIP Settings**.
* [Daily SIP / PSTN docs](https://docs.daily.co/reference/rest-api/sip)
### Syncing the Call-ID
Daily includes SIP information directly in the dial-in settings payload, no extra configuration is needed.
### SIP setup
**What is the LiveKit SIP bridge?** It is an **optional** add-on service for LiveKit projects that lets a normal phone call (SIP) enter a LiveKit room so your agent worker can talk to the caller. If you are building on LiveKit, you can choose to use this bridge as your phone ingress, or you can keep using your own SIP provider (Twilio, Telnyx, etc.) instead.
1. **SIP URI:** copy your project's SIP URI from the LiveKit Cloud console (shape: `sip:.sip.livekit.cloud`).
 2. **Username / Password:** the `auth_username` / `auth_password` on your **inbound SIP trunk** (not your LiveKit API key).
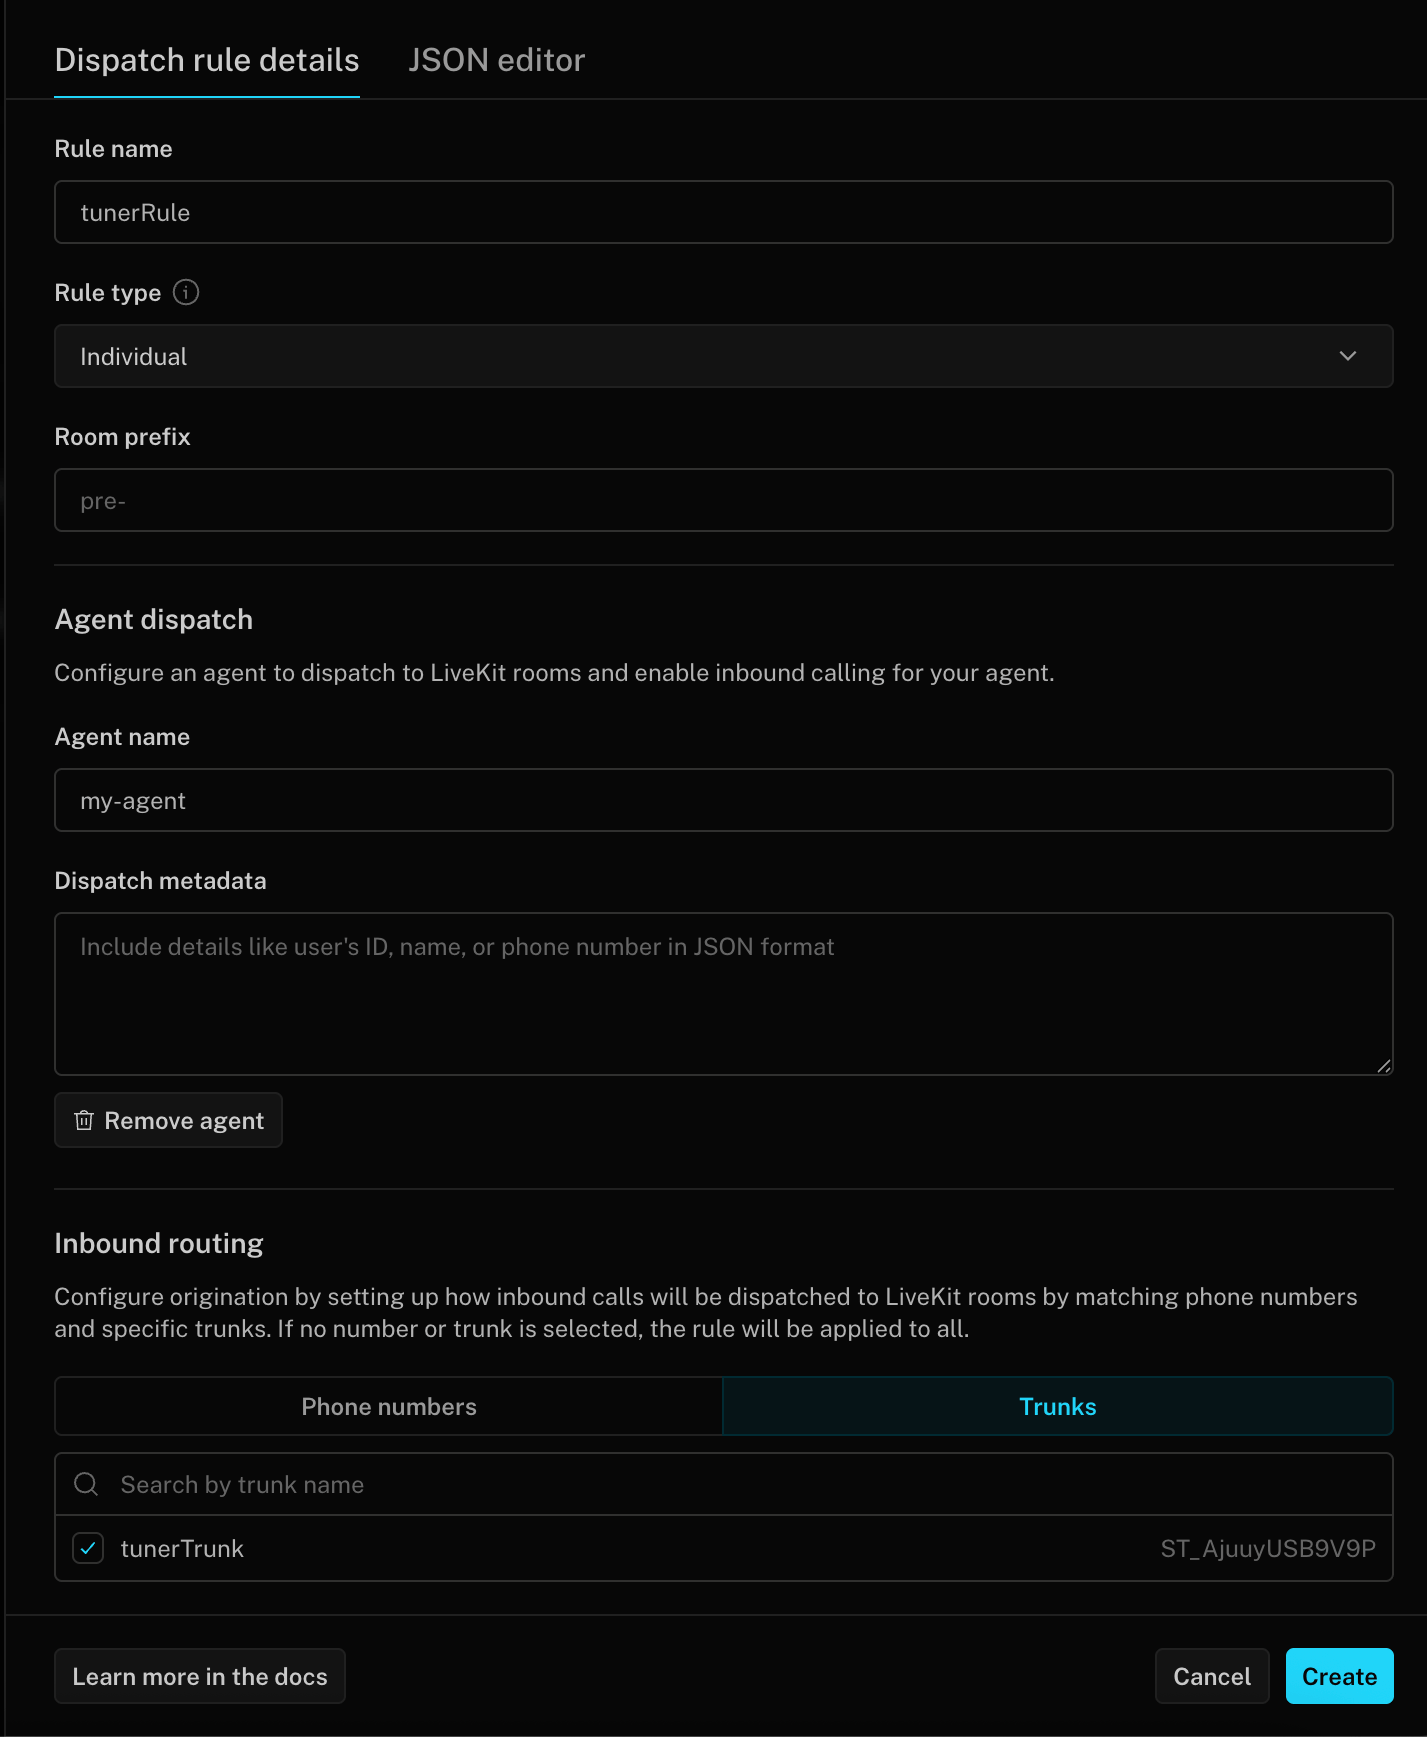
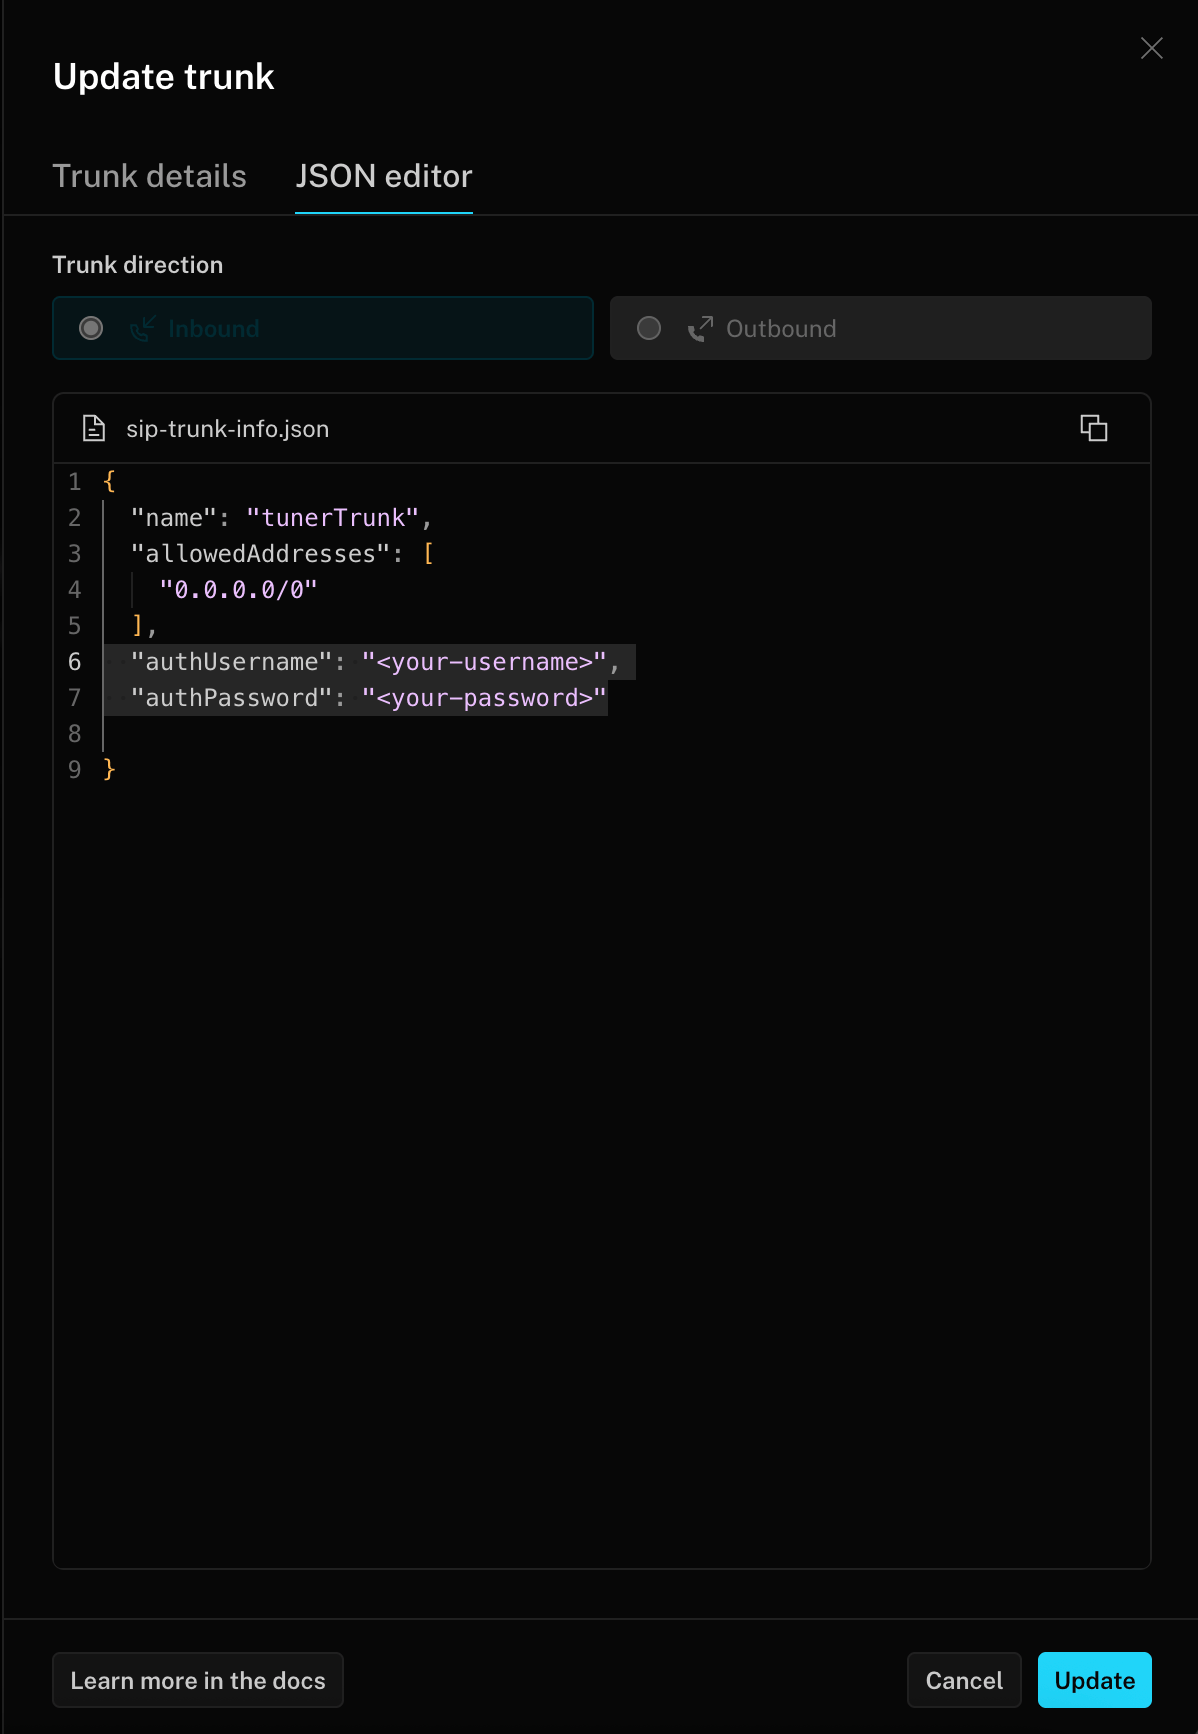 3. Add a **dispatch rule** so inbound calls reach your agent worker.
 Follow LiveKit's docs for current steps:
* [Inbound trunk](https://docs.livekit.io/sip/trunk-inbound/)
* [SIP trunk setup](https://docs.livekit.io/telephony/start/sip-trunk-setup/)
* [Dispatch rule](https://docs.livekit.io/sip/dispatch-rule/)
Paste the SIP URI and inbound-trunk credentials into Tuner → **Agent Settings → SIP Settings**.
### Syncing the Call-ID
When using the LiveKit SIP bridge, SIP metadata is available as participant attributes within the LiveKit room.
* [LiveKit SIP docs](https://docs.livekit.io/sip/)
* [Connecting to LiveKit — Tuner guide](/docs/api-and-integrations/connecting-to-livekit)
### SIP setup
If you terminate SIP yourself (Asterisk, FreeSWITCH, Kamailio, or similar), you have direct access to the SIP URI and credentials. Paste them into Tuner → **Agent Settings → SIP Settings**.
### Syncing the Call-ID
You have direct access to the `Call-ID` header. Pass it to Tuner through whichever integration method you use, no provider-specific configuration needed.
* [Create Call API](/docs/api-reference/create-call)
***
## Sync the call back with the SIP ID
Placing the call is only half of simulation, Tuner also has to recognise the call your agent syncs back as the one it just dialled. To make that link, Tuner uses the **SIP Call-ID** that travels with the call.
## The Call-ID may arrive under a different name
When Tuner dials your agent, it sends a standard SIP `INVITE` that contains a `Call-ID` header:
```
INVITE sip:your-agent@provider.example SIP/2.0
Call-ID: 2jf9wCCXfwgxKkTOfLcEsA5LD6f
...
```
Your SIP provider receives this `INVITE`, accepts the call, and captures that `Call-ID`. It then surfaces the value to your application, which you pass back to Tuner via the [Create Call API](/docs/api-reference/create-call) or one of the Tuner SDKs.
SIP is a standard, but every provider wraps it in their own platform. By the time the call reaches your application code, the original `Call-ID` header may have been renamed, nested inside a larger object, or even dropped entirely unless you opt in to forwarding it. Here are some real-world examples of how this happens:
* **Renamed field**: A provider receives the SIP `Call-ID` but exposes it to your app as `SipCallId`, `sip_call_id`, or `call_id`. The value is the same, but the key is different from the original SIP header name.
* **Nested inside metadata**: Instead of a top-level field, the `Call-ID` may appear inside a nested object like `sip.headers["Call-ID"]` or within a `custom_headers` list that you need to iterate through.
* **Not forwarded by default**: Some providers split the call into two legs: an HTTP webhook (which receives SIP context) and a WebSocket (which carries the audio). The SIP fields may only be available on the webhook side, and you need to explicitly configure your webhook response to forward them to the WebSocket as custom parameters.
* **Replaced with a provider-native ID**: If the provider does not forward the SIP `Call-ID` at all, your app may only see the provider's own internal identifier (e.g. a `CallSid`, `call_control_id`, or `call_sid`). This is **not** the same as the original SIP `Call-ID` that Tuner sent, and simulation linking will not work unless you configure forwarding.
* **Regenerated across hops**: If the call passes through multiple SIP intermediaries (e.g. a SIP bridge → a PBX → your provider), each hop may generate its own `Call-ID`. In these cases, look for a correlation header like `X-CID` or `X-Correlation-Id` that carries the original value across all hops.
The bottom line: **don't assume the original `Call-ID` will just be there.** Check your provider's documentation for how SIP headers are surfaced to your application, and verify that the value you're sending back to Tuner matches the one Tuner originally sent. When in doubt, capture a test call and inspect the raw payload your application receives.
### Passing the Call-ID back to Tuner
How you pass this value back depends on how you sync calls into Tuner:
* **LiveKit**: follow the [Connecting to LiveKit](/docs/api-and-integrations/connecting-to-livekit) SDK guide. Pass the `Call-ID` value as the `sip_correlation_id` argument in the Tuner LiveKit plugin.
* **Pipecat**: follow the [Connecting to Pipecat](/docs/api-and-integrations/connecting-to-pipecat) SDK guide. Pass the `Call-ID` value as the `sip_call_id` argument in the Tuner Pipecat observer.
* **Custom integration (API)**: include the `Call-ID` value as `sip_call_id` in the payload you send to the [Create Call API](/docs/api-reference/create-call).
Without `sip_call_id` coming back on the synced call, the call still gets ingested, it just won't be linked to its simulation row and will appear as ordinary production traffic instead.
***
Paste your SIP URI and credentials into **Agent Settings → SIP Settings**, click **Verify & Save**, and you're ready to run simulations.
***
Configure your simulation mix and start a batch.
Follow LiveKit's docs for current steps:
* [Inbound trunk](https://docs.livekit.io/sip/trunk-inbound/)
* [SIP trunk setup](https://docs.livekit.io/telephony/start/sip-trunk-setup/)
* [Dispatch rule](https://docs.livekit.io/sip/dispatch-rule/)
Paste the SIP URI and inbound-trunk credentials into Tuner → **Agent Settings → SIP Settings**.
### Syncing the Call-ID
When using the LiveKit SIP bridge, SIP metadata is available as participant attributes within the LiveKit room.
* [LiveKit SIP docs](https://docs.livekit.io/sip/)
* [Connecting to LiveKit — Tuner guide](/docs/api-and-integrations/connecting-to-livekit)
### SIP setup
If you terminate SIP yourself (Asterisk, FreeSWITCH, Kamailio, or similar), you have direct access to the SIP URI and credentials. Paste them into Tuner → **Agent Settings → SIP Settings**.
### Syncing the Call-ID
You have direct access to the `Call-ID` header. Pass it to Tuner through whichever integration method you use, no provider-specific configuration needed.
* [Create Call API](/docs/api-reference/create-call)
***
## Sync the call back with the SIP ID
Placing the call is only half of simulation, Tuner also has to recognise the call your agent syncs back as the one it just dialled. To make that link, Tuner uses the **SIP Call-ID** that travels with the call.
## The Call-ID may arrive under a different name
When Tuner dials your agent, it sends a standard SIP `INVITE` that contains a `Call-ID` header:
```
INVITE sip:your-agent@provider.example SIP/2.0
Call-ID: 2jf9wCCXfwgxKkTOfLcEsA5LD6f
...
```
Your SIP provider receives this `INVITE`, accepts the call, and captures that `Call-ID`. It then surfaces the value to your application, which you pass back to Tuner via the [Create Call API](/docs/api-reference/create-call) or one of the Tuner SDKs.
SIP is a standard, but every provider wraps it in their own platform. By the time the call reaches your application code, the original `Call-ID` header may have been renamed, nested inside a larger object, or even dropped entirely unless you opt in to forwarding it. Here are some real-world examples of how this happens:
* **Renamed field**: A provider receives the SIP `Call-ID` but exposes it to your app as `SipCallId`, `sip_call_id`, or `call_id`. The value is the same, but the key is different from the original SIP header name.
* **Nested inside metadata**: Instead of a top-level field, the `Call-ID` may appear inside a nested object like `sip.headers["Call-ID"]` or within a `custom_headers` list that you need to iterate through.
* **Not forwarded by default**: Some providers split the call into two legs: an HTTP webhook (which receives SIP context) and a WebSocket (which carries the audio). The SIP fields may only be available on the webhook side, and you need to explicitly configure your webhook response to forward them to the WebSocket as custom parameters.
* **Replaced with a provider-native ID**: If the provider does not forward the SIP `Call-ID` at all, your app may only see the provider's own internal identifier (e.g. a `CallSid`, `call_control_id`, or `call_sid`). This is **not** the same as the original SIP `Call-ID` that Tuner sent, and simulation linking will not work unless you configure forwarding.
* **Regenerated across hops**: If the call passes through multiple SIP intermediaries (e.g. a SIP bridge → a PBX → your provider), each hop may generate its own `Call-ID`. In these cases, look for a correlation header like `X-CID` or `X-Correlation-Id` that carries the original value across all hops.
The bottom line: **don't assume the original `Call-ID` will just be there.** Check your provider's documentation for how SIP headers are surfaced to your application, and verify that the value you're sending back to Tuner matches the one Tuner originally sent. When in doubt, capture a test call and inspect the raw payload your application receives.
### Passing the Call-ID back to Tuner
How you pass this value back depends on how you sync calls into Tuner:
* **LiveKit**: follow the [Connecting to LiveKit](/docs/api-and-integrations/connecting-to-livekit) SDK guide. Pass the `Call-ID` value as the `sip_correlation_id` argument in the Tuner LiveKit plugin.
* **Pipecat**: follow the [Connecting to Pipecat](/docs/api-and-integrations/connecting-to-pipecat) SDK guide. Pass the `Call-ID` value as the `sip_call_id` argument in the Tuner Pipecat observer.
* **Custom integration (API)**: include the `Call-ID` value as `sip_call_id` in the payload you send to the [Create Call API](/docs/api-reference/create-call).
Without `sip_call_id` coming back on the synced call, the call still gets ingested, it just won't be linked to its simulation row and will appear as ordinary production traffic instead.
***
Paste your SIP URI and credentials into **Agent Settings → SIP Settings**, click **Verify & Save**, and you're ready to run simulations.
***
Configure your simulation mix and start a batch.