

Prerequisites: an active Vapi account with at least one assistant, and a Tuner account. No code is needed. If you create Vapi assistants at call time, see Vapi transient assistants instead.
Overview
You connect a Vapi assistant from the agent setup wizard in Tuner. You paste your Vapi Private API key, pick the assistant, and Tuner configures the Vapi server URL for you.1
Get your Vapi Private API key
Copy a Private API key from the Vapi dashboard.
2
Create the agent in Tuner
Click Create New Agent, choose Vapi, connect your key and pick your assistant.
3
Import recent calls
On the last wizard step, import your most recent Vapi calls so they’re evaluated right away.
No webhook configuration needed. When you create the agent, Tuner sets the server URL on your Vapi assistant. This replaces any server URL already set there. See Webhooks for how to keep your existing automations running.
Step 1: Get your Vapi API key
Use a Private API Key from Vapi. The Public key is meant for client-side use; Tuner needs a Private key for server-side access.- Log in to the Vapi dashboard.
- Open API Keys using either path:
- Click your profile menu (top right) and choose Vapi API Keys, or
- Go directly to dashboard.vapi.ai/org/api-keys.
- Under Private API Keys, copy an existing key or create a new one.
Find your Vapi Assistant ID (only if needed)
The wizard lists your Vapi assistants, so you usually don’t need the Assistant ID. You only type it in if the list can’t load or is empty.- In the Vapi dashboard, open Assistants and click the assistant you want to connect.
- Copy the Assistant ID from the assistant detail page. It may also appear in the page URL.
Step 2: Create your agent in Tuner
1
Open the wizard
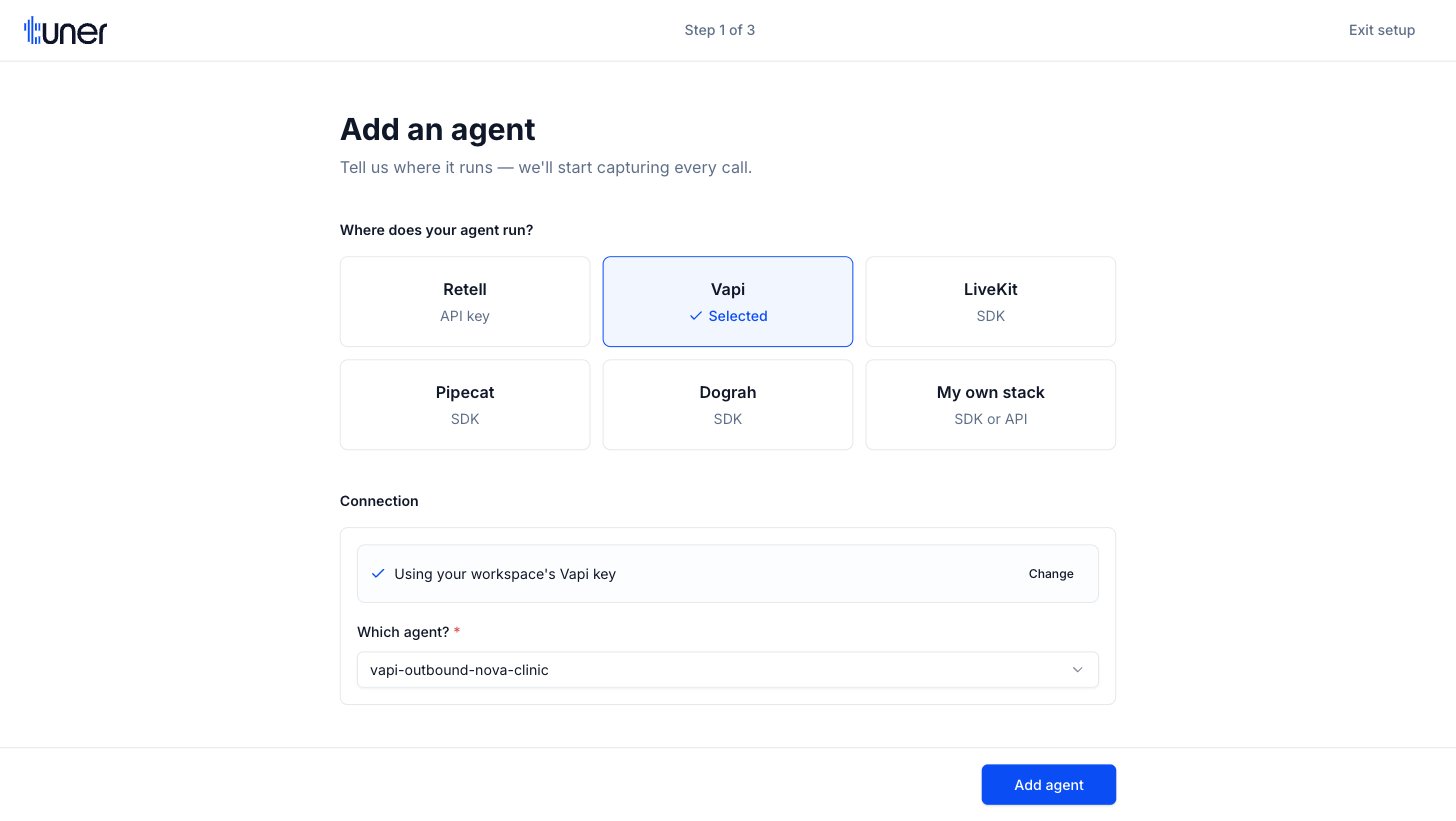
In the sidebar, click Create New Agent. Before your workspace has its first agent, the button reads Set up your first agent. The full-screen setup wizard opens.
2
Choose Vapi
Under Where does your agent run?, select Vapi.
3
Connect your Vapi API key
Under Connection, paste your Private key into Vapi API key and click Connect. Tuner validates the key and stores it in your workspace settings.If your workspace already has a Vapi key, the wizard shows Using your workspace’s Vapi key instead. Click Change to use a different key.
4
Pick your assistant
In Which agent?, choose the Vapi assistant to connect. Tuner selects the first assistant in the list and fills in Agent name and the system prompt from Vapi. You can edit both.If the list can’t load or your account has no assistants, the wizard shows an Agent ID field instead. Paste the Assistant ID from Vapi.
5
Fill in the details
Under Details, check Agent name and set Call direction to Inbound or Outbound, matching how the assistant is used. The system prompt is optional; click Add system prompt (optional) to add one if it wasn’t imported.
6
Add the agent
Click Add agent. Tuner creates the agent and sets its server URL on your Vapi assistant.
7
Choose how to configure it
Under How do you want to configure it?, choose Start from a template, Configure via MCP or Set up manually, then click Continue.
8
Get your first evaluated call
The last step checks your Vapi account for recent calls. See Import recent Vapi calls.
Save the key in Workspace Settings instead
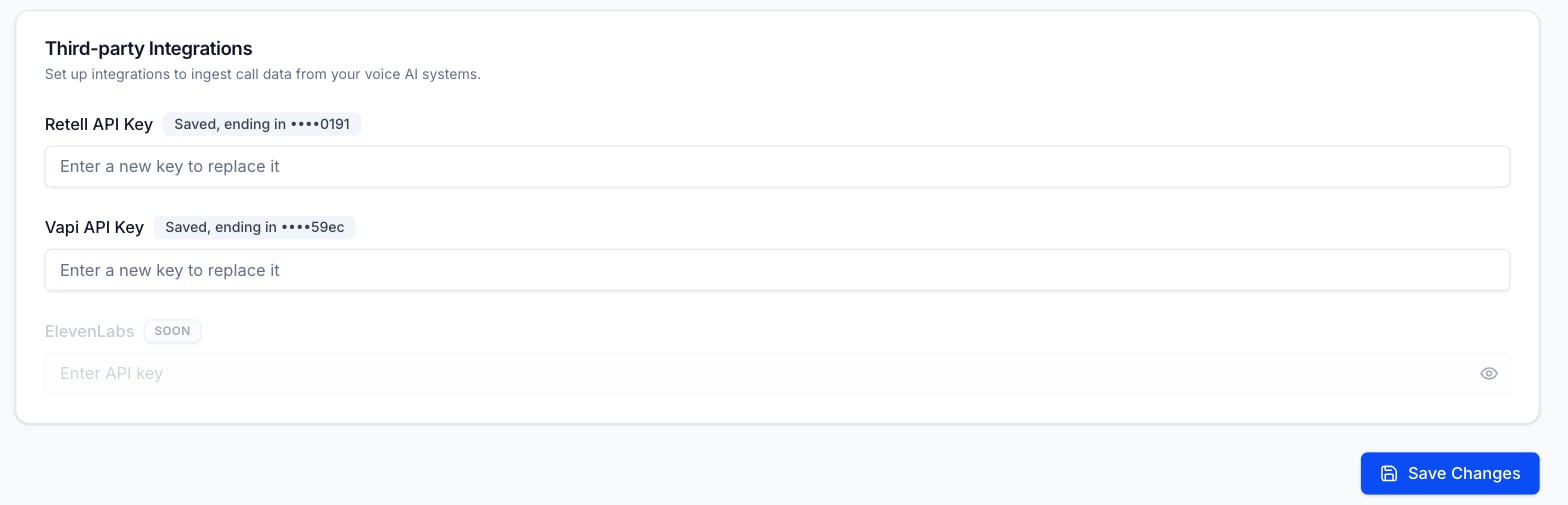
You can also save or replace your Vapi key outside the wizard:- Open Workspace Settings > General Settings.
- Under Third-party Integrations, paste your Private key into Vapi API Key.
- Click Save Changes.
Import recent Vapi calls
On the last wizard step, Get your first evaluated call, Tuner checks your Vapi account for calls from the connected assistant.1
Review the calls found
If Tuner finds recent calls, it shows a Found N recent calls card.
2
Import and evaluate them
Click Import & evaluate all N. Tuner imports your most recent calls and runs your evals on them. A progress bar shows how many are done. Importing needs available credits in your workspace.
3
View the results
When the import finishes, click View your calls to finish setup and open Call Logs.
Enable simulation
Required if you’ll use Call Simulation. Skip it otherwise. Neither direction needs code.Inbound
Create a Free Vapi SIP trunk linked to your assistant, then add its SIP URI in Agent Settings > Simulation Setup. See Simulate a Vapi agent.Outbound
Open Agent Settings > Simulation Setup. Enter your Vapi number’s VAPI Phone Number ID, or choose No, I don’t have one to run the in-app setup that creates one. See Set up outbound simulation.Check simulation works
Start a simulation run. See Run a simulation. When the call ends, check its result in the run. If it shows Unreported, Tuner never received a matching call from Vapi. See Fix an Unreported run.Webhooks
Add that URL in Tuner under Agent Settings > Webhooks instead. It then receives:- Tuner events:
call.analyzedandalert.fired. - Vapi’s
end-of-call-reportmessage: forwarded as acall.receivedevent, with Vapi’s original body inpayload.
end-of-call-report message. Other Vapi server messages are not forwarded, so an automation that depends on them stops receiving them.
See Webhooks for the event format, headers and URL requirements.
Troubleshooting
The key won't connect
The key won't connect
The wizard shows an error under Vapi API key when Vapi rejects the key. Check that you used a Private key, not the Public key, and that you copied it with no extra spaces. If it still fails, create a new Private key in Vapi and try again.
My assistant isn't in the list
My assistant isn't in the list
If you have many Vapi assistants, the list shows the most recent ones. If your assistant is missing, or the wizard shows the Agent ID field, paste the Assistant ID from Vapi.
Calls don't appear in Tuner
Calls don't appear in Tuner
Check that the agent’s Agent Remote ID in Agent Settings > Agent Setup matches the Vapi Assistant ID, and that a Vapi Private key is saved under Workspace Settings > General Settings > Third-party Integrations.
Next steps
Set up simulation for Vapi
Create a SIP trunk in Vapi, connect it to Tuner, and run your first simulation batch.
Configure via MCP
Use your IDE or chat app to generate outcomes, intents, evals and alerts.